Supplier Addresses
Suppliers use the Supplier Information Form to submit requests to have additional addresses added, replace an existing address, or have an address marked as inactive in OAKS FIN.
Review Supplier Forms
Ensure that the proper and complete documentation for the requested change has been received:
Click herehere
for instructions on forms that contain only Lock box, drawer, file
#, department #, etc. in the address.
- When a form
is received that only contains a Lock box, drawer, file #,
etc in the address, enter it into OAKS FIN as a PO Box #.
- For example
- "File # 7247, Columbus, Ohio 19170-7531" should
be entered in OAKS FIN as "PO Box 7247, Columbus,
Ohio 19170-7531."
- If both addresses
are listed, go to USPS
website and verify address, then enter the Lock box, drawer,
or file number on Address
Line 1 in OAKS FIN and the PO Box on Address Line 2 in
OAKS FIN.
- When
there is a discrepancy between any (2) cities listed on forms and/or
systems, where the street addresses and zip codes match, both street/city
addresses are verified through USPS to validate that both cities listed
are valid options and therefore are considered a "match"
for processing. (Example: ABC St, Westerville, OH 43081 on the EFT
form, but MITS and bank verification list ABC St, Columbus, OH 43081).
Search for Supplier Record
Adding an Address
- Begin by clicking the Identifying Information tab.
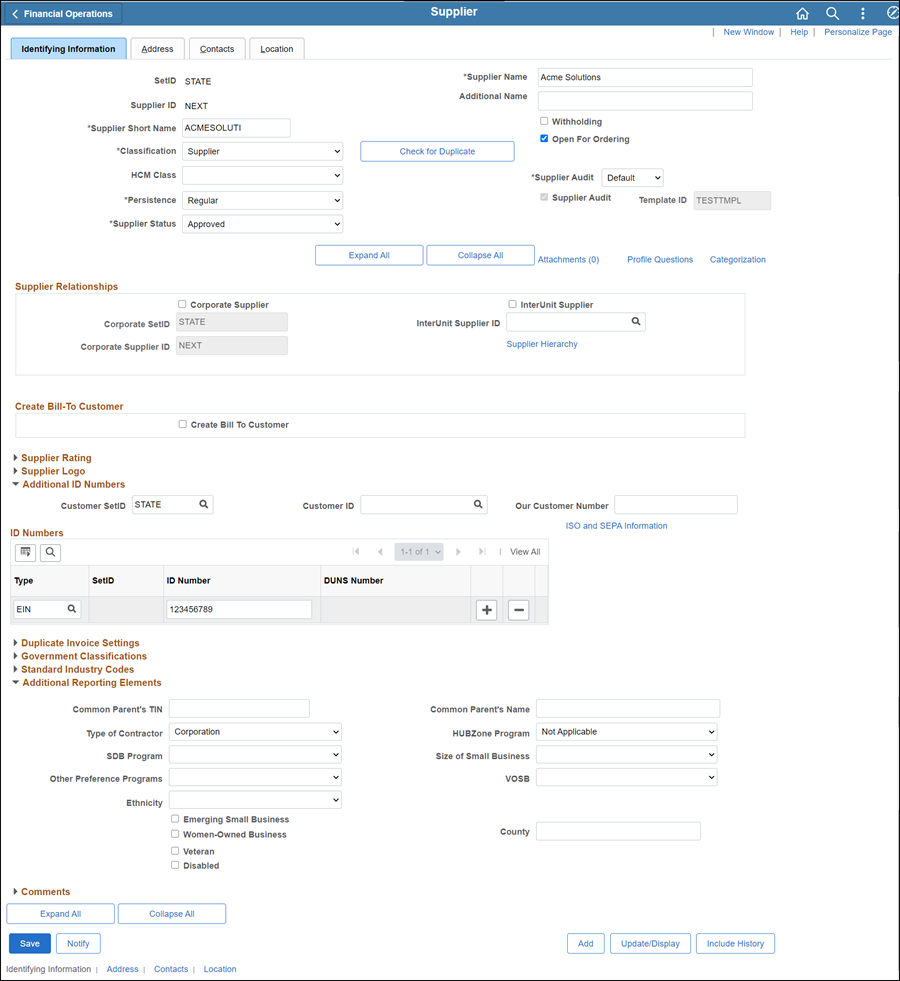
- All supporting documentation must be attached to the supplier's record on the Identifying Information tab.
- Acceptable form formats include JPEG, PDF and TIF.
- Click herehere for instructions on attaching supporting documentation to the supplier record.
- Click the Attachments
link.
- The Supplier Attachment
page displays.
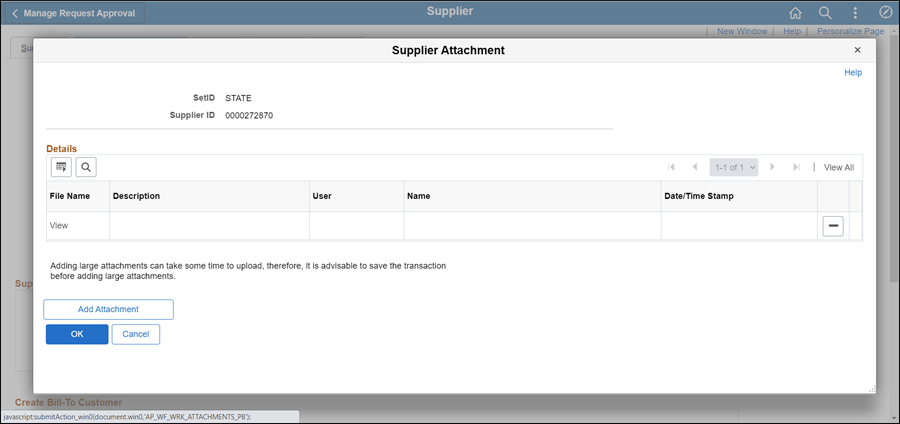
- Click Add Attachment.
- Copy the Document URL
from the Supplier Operations Tracker.
- Click Browse.
- Paste the Document
URL into the File
name.
- Click Open.
- Click Upload.
- The Supplier Attachment
page displays.
-
Update Description with <descriptive
name of the document> (e.g., "VIF W9 EFT").
-
Click OK.
- The Identifying
Information tab displays.
- Click the Address tab.
- The Address tab displays.
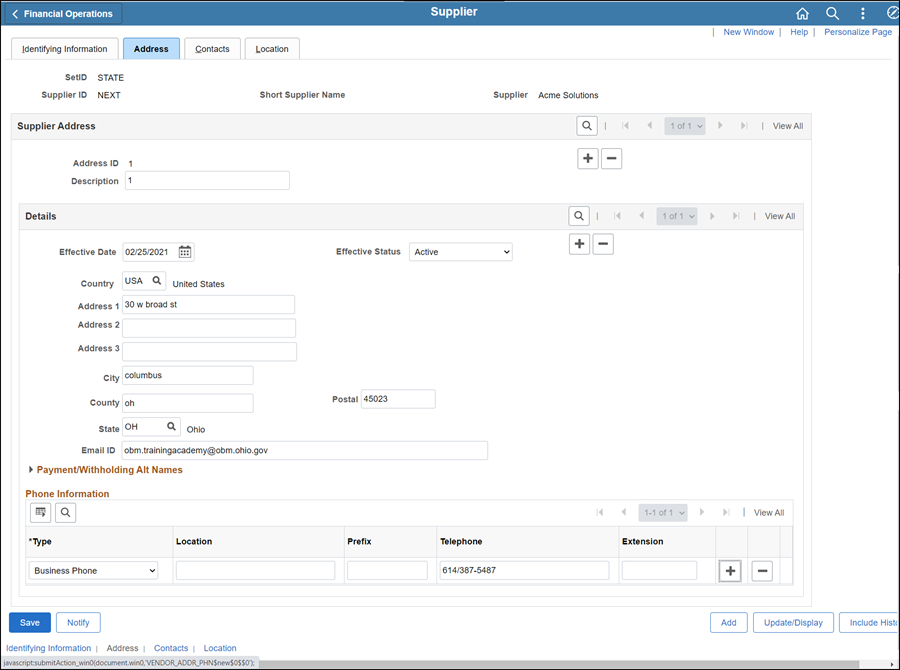
- Click the Add a new row icon in the Supplier Address section.
- Update the Description field with the Address ID.
-
- The Address ID is the number of the address being entered (i.e., "1" for the first address, "2" for the 2nd address, etc.).
- Confirm the Effective Date displays today's date.
- Enter the address using Address 1, Address 2, City, County (if available), Postal (zip code), and State fields.
For school
districts, schools, colleges, universities, government entities, hospitals,
the school location, division or department name is included on Address 1 for postal routing purposes.
- Update the Email ID field with email address if provided in Section 2 of the "Supplier Information Form" (if not provided in Section 2, enter the email address specified in Section 4, if applicable).
- Select "Business Phone" from the phone information Type dropdown and select the applicable option.
- Update the Telephone field with the business phone number provided on the Supplier Information Form (format 6145557777).
- Do not update the Prefix field.
- Update the Extension field with the extension number when provided on the "Supplier Information Form."
- If a fax number is provided in Section 2 of the "Supplier Information Form," click the Add a new row icon next to the Extension field and enter the fax number information (if not provided in Section 2, enter the fax number specified in Section 5, if applicable).
- Click the Location tab.
- Verify that the "CHK" Location Default checkbox is marked (i.e., the "EFT" location cannot be marked as default when there are multiple addresses on the supplier record).
- Click Save.
- Click OK.
- If any other updates are to be made (e.g., contacts, pay terms, etc.), refer to the applicable topic before proceeding to the Summary tab.
- If all necessary updates have been made, click the Summary tab and proceed to the "Summary tab" instructions below.
Replacing an Address
- If an old/previous address listed in Section 1of the "Supplier Information Form" matches the address on the Supplier record in OAKS FIN, begin by clicking the Identifying Information tab.
- All supporting documentation must be attached to the supplier's record on the Identifying Information tab.
- Acceptable form formats include JPEG, PDF and TIF.
- Click herehere for instructions on attaching supporting documentation to the supplier record.
- Click the Attachments
link.
- The Supplier Attachment
page displays.
- Click Add Attachment.
- Copy the Document URL
from the Supplier Operations Tracker.
- Click Browse.
- Paste the Document
URL into the File
name.
- Click Open.
- Click Upload.
- The Supplier Attachment
page displays.
-
Update Description with <descriptive
name of the document> (e.g., "VIF W9 EFT").
-
Click OK.
- The Identifying
Information tab displays.
- Click the Address tab.
- Click the Add a new row icon in the Details section.
- Do not update the Address ID in the Description field.
- Confirm the Effective Date displays today's date.
- Enter address using Address 1, Address 2, City, County (if available), Postal (zip code), and State fields.
For school
districts, schools, colleges, universities, government entities, hospitals,
the school location, division or department name is included on Address 1 for postal routing purposes.
- Update the Email ID field with email address if provided in Section 2 of the "Supplier Information Form" (if not provided in Section 2, enter the email address specified in Section 4, if applicable).
- Select "Business" from the phone information Type dropdown and select the applicable option.
- Update the Telephone field with the business phone number provided on the Supplier Information Form (format 6145557777).
- Do not update the Prefix field.
- Update the Extension field with the extension number when provided on the Supplier Information Form.
- If a fax number is provided in Section 2 of the "Supplier Information Form," click the Add a new row icon next to the Extension field and enter the fax number information (if not provided in Section 2, enter the fax number specified in Section 5, if applicable).
- Click Save.
- The Preview Supplier Audit page displays an audit of the changes made to the suppliers account.
- Click OK.
- If any other updates are to be made (e.g., contacts, pay terms, etc.), refer to the applicable topic before proceeding to the Summary tab.
- If all necessary updates have been made, click the Summary tab and proceed to the "Summary tab" instructions below.
Inactivating an Address
If the "Supplier Information Form" or supporting documentation includes a request to inactivate an address, click the Identifying Information tab to begin.
- All supporting documentation must be attached to the supplier's record on the Identifying Information tab.
- Acceptable form formats include JPEG, PDF and TIF.
- Click herehere for instructions on attaching supporting documentation to the supplier record.
- Click the Attachments
link.
- The Supplier Attachment
page displays.
- Click Add Attachment.
- Copy the Document URL
from the Supplier Operations Tracker.
- Click Browse.
- Paste the Document
URL into the File
name.
- Click Open.
- Click Upload.
- The Supplier Attachment
page displays.
-
Update Description with <descriptive
name of the document> (e.g., "VIF W9 EFT").
-
Click OK.
- The Identifying
Information tab displays.
- Click the Address tab
- Locate the specific address that needs to be inactivated.
-
- If the address being inactivated is the only address setup for the supplier, contact the supplier to confirm desired action.
-
- Confirm that the supplier address to be inactivated is currently in "Active" Status.
- If the address has already been inactivated, no further action is required.
- If the address has not already been inactivated, continue to the next step.
-
Click the Add a new row icon in the Details section.
- Confirm the Effective Date displays today's date.
- Update Status to "Inactive."
- Click the Contacts tab.
- Review all of the Contacts to confirm that they are not linked to the address being inactivated.
- Inactivate the Contact linked to the corresponding address.
-
- If the address being inactivated is Address 1 and a Contact is linked to Address 1, update the linked address to the next available address on the supplier record before continuing.
- If the Contact(s) are not linked to the address being inactivated, proceed to the next step.
- Click the Location tab.
- Click the Add a new row icon in the Details section.
- Expand the Comments section.
- Enter "<today's date>, an explanation for the inactivation, <first and last initial>."
- Click Save.
- From the "CHK" Location, click the Payables link.
- The Payables Options page displays.
- Review the Invoicing and Remitting Address fields to confirm that they are not linked to the address number being inactivated.
- If the Invoicing or Remitting addresses are linked to the address being inactivated, update the linked address to the next available address on the supplier record before continuing.
-
- If the "Supplier Information Form" specifies the remittance address that should now be used, the Invoicing or Remitting should be linked to that specified address.
- If the Invoicing or Remitting addresses are not linked to the address being inactivated, proceed to the next step.
- Click OK.
- Click the Procurement link.
- Review the Ordering, Returning, and Ship From Address fields to confirm that they are not linked to the address number being inactivated.
-
If the Ordering, Returning, or Ship From addresses are linked to the address being inactivated, update the linked address to the next available address on the supplier record before continuing.
-
-
If the "Supplier Information Form" specifies the remittance address that should now be used, the Ordering, Returning, or Ship From should be linked to that specified address.
-
If the Ordering, Returning, or Ship From addresses are not linked to the address being inactivated, proceed to the next step.
-
Click OK.
- The Location tab displays.
-
Click Show the Next Row icon to review the next location (e.g., EMAIL PO, FAX PO, or EFT), if applicable.
-
Repeat steps 16-22 above for EMAIL and FAX locations, if applicable.
-
If there is an "EFT" location setup for the address being inactivated (e.g., address #2 is being inactivated and there is an "EFT-2" location setup), mark the EFT Location Status "Inactive" by completing the following steps.
- Click the Add a new row icon in the Details section.
- Confirm the Effective Date displays today's date.
- Update Status to "Inactive."
-
Click the 1099 link.
-
Review the Address Number in the 1099 Reporting Information section to confirm that it is not linked to the address number being inactivated.
-
If the 1099 Reporting Address is linked to the address being inactivated, update the reference address sequence # to the next available address on the supplier record before continuing.
-
-
If the 1099 Reporting Address is not linked to the address being inactivated, proceed to the next step.
- Click OK.
- The Location tab displays again.
- Click Save.
- The Preview Supplier Audit page displays an audit of the changes made to the suppliers account.
- Click OK.
- If any other updates are to be made (e.g., contacts, pay terms, etc.), refer to the applicable topic before proceeding to the Summary tab.
- If all necessary updates have been made, click the Summary tab and proceed to the "Summary tab" instructions below.
Summary tab
The supplier file Summary tab
provides an overview of the supplier record.
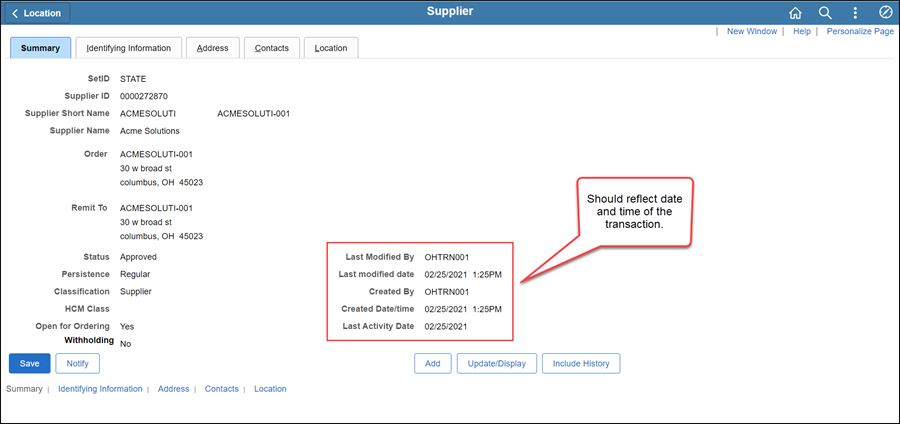
Once all updates have been made to the supplier record, review
the Summary tab to
verify that the record was modified.
 Next steps - Updating the Supplier Operations Tracker