Supplier Tax ID Number Change
Suppliers often obtain a new Tax ID Number when the type of business
entity changes, a business is merged, etc. When this occurs, the supplier
will submit a request to OSS to update their supplier record in OAKS FIN.
Review Supplier Forms
Ensure
that the proper and complete documentation for the requested change has
been received:
Search for Existing Supplier Record
Obsolete Existing Supplier Record
- If there are open invoices for the supplier:
- Proceed to create a new supplier record.
- Do not obsolete
the current supplier record.
- Continue
to run unpaid voucher report daily. Once there are no open
transactions, obsolete the current supplier record.
- If there are no
open invoice(s) for the supplier, proceed to the next step
for creating a new supplier record and obsoleting the current
supplier record.
Create New Supplier Record
A new supplier record will be created in OAKS FIN with the new tax ID
number to replace the existing supplier record with the old tax ID number.
- Click New
WindowNew
Window link to open a separate instance
of OAKS FIN.
- Refer to the "Adding
a New Supplier" section to create a new supplier with the
new Tax ID number on the updated W-9.
- Click the Identifying Information
tab.
- All supporting documentation must be attached
to the supplier's record on the Identifying
Information tab.
- Acceptable form formats include JPEG,
PDF and TIF.
- Click herehere
for instructions on attaching supporting documentation to the
supplier record.
- Click the Attachments
link.
- The Supplier Attachment
page displays.
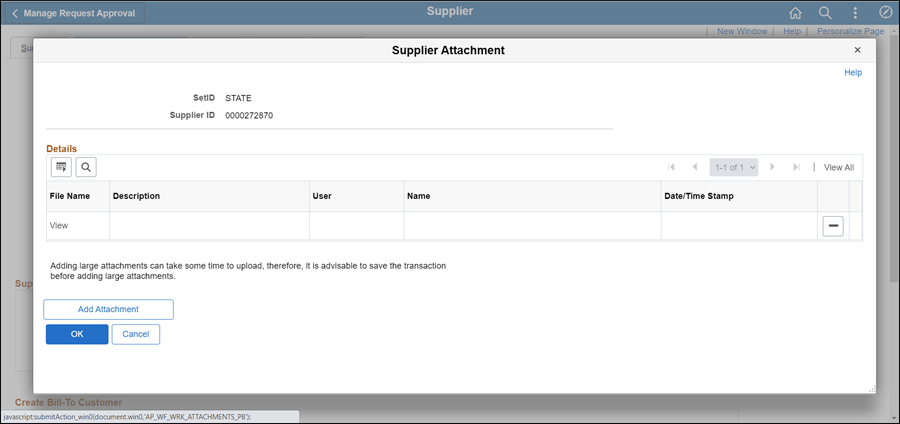
- Click Add Attachment.
- Copy the Document URL
from the Supplier Operations Tracker.
- Click Browse.
- Paste the Document
URL into the File
name.
- Click Open.
- Click Upload.
- The Supplier Attachment
page displays.
Update Description with <descriptive
name of the document> (e.g., "VIF W9 EFT").
Click OK.
- The Identifying
Information tab displays.
- Click the Location tab.
- Click the Comments
collapsible region.
- Enter Comment,
"<Date> "replaces <supplier ID number> due
to change of TIN" <associate's initials>"
at the top of the field (above any previous comments).
- Do not delete previous comments.
- Return to the supplier record becoming obsolete (with the old tax
ID number) opened in a separate window.
- If the forms received indicates that the supplier
would like the old Tax ID obsoleted, then proceed to step 1 of "Obsolete
Supplier Record" below. If the old Tax ID is to remain active,
click the Summary
tab and proceed to the Summary
tab instructions below.
Obsolete Supplier Record
The supplier record containing the old tax ID number must be marked
supplier obsolete.
- Click the Identifying Information
tab of the old Supplier ID.
- Uncheck Open For Ordering
checkbox.
- All supporting documentation must be attached
to the supplier's record on the Identifying
Information tab.
- Acceptable form formats include JPEG,
PDF and TIF.
- Click herehere
for instructions on attaching supporting documentation to
the supplier record.
- Click the Attachments
link.
- The Supplier Attachment
page displays.
- Click Add Attachment.
- Copy the Document
URL from the Supplier Operations Tracker.
- Click Browse.
- Paste the Document
URL into the File
name.
- Click Open.
- Click Upload.
- The Supplier Attachment
page displays.
Update Description with <descriptive
name of the document> (e.g., "VIF W9 EFT").
Click OK.
- The Identifying
Information tab displays.
- Click the Address
tab.
- On all
of the Address pages:
- Click the Add
a new row icon in the Details
Section.
- Confirm the Effective
Date displays today's date.
- In the Address 1 field, enter "SUPPLIER OBSOLETE USE
<Supplier ID #>."
- In the City field,
enter "OBSOLETE."
- Clear the County
field.
- Enter State, "OH."
- Replace the Postal
fields with "99999".
- Clear the
Email,
Telephone, and
Fax fields.
- Click the Contacts
tab.
- Click the Add a new row
icon in the details section to add a
row.
- Confirm the Effective
Date displays today's date.
- Select Inactive from
the Status dropdown.
- Click the Location
tab.
Click the Add a new row
in the details section to add a row to the CHK location.
Confirm the Effective Date
displays today's date
Click the Payables
link.
Select the Additional Payables
Options section.
Check Hold Payment
checkbox in the payment control section.
Repeat this process for each payment method.
- If PO Dispatch Locations exist:
Click the Add a new row
in the details section to add a row to the Email and Fax locations.
Confirm the Effective Date
displays today's date
Change Status to
Inactive.
- Click Save.
- The Preview
Supplier Audit page displays an audit of the changes
made to the suppliers account.
- Click OK.
- Click the Summary tab.
Summary tab
The supplier file Summary tab
provides an overview of the supplier record.
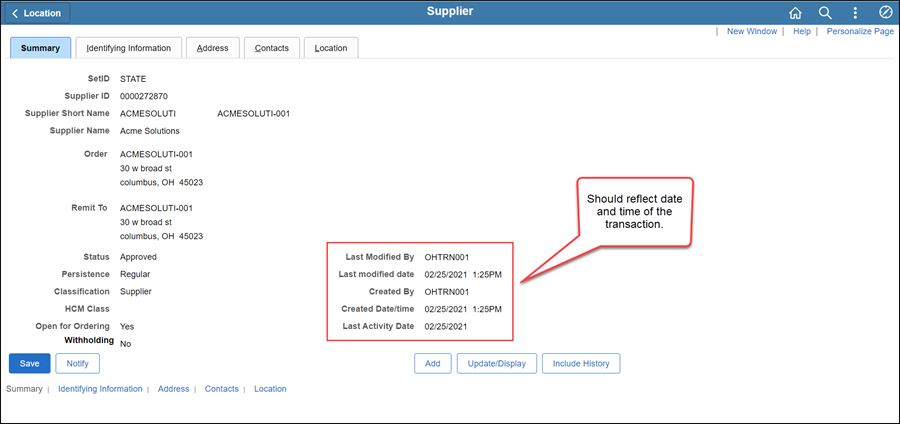
Once all updates have been made to the supplier record, review
the Summary tab to
verify that the record was modified.
 Next steps - Updating the Supplier Operations
Tracker
Next steps - Updating the Supplier Operations
Tracker