Adding a State Employee Supplier
Participating agencies may wish
to establish a state employee as a supplier, but the employee must already
be entered in OAKS HCM.
If information provided on the supplier form(s)
is unclear and/or conflicting, use any additional backup documentation
to assist with processing (e.g., phone calls, coversheets, emails,
Secretary of State website, websites, etc.). Note the results on the
Supplier Operations Tracker.
If the supplier name is conflicting
on the forms, backup documentation, and/or OAKS FIN due to the adding
or deleting of the letter "s" to make a word plural, singular,
or possessive (e.g., enterprise / enterprises), use additional resources
such as a phone call, Secretary of State website, supplier website,
etc. to confirm the supplier name.
Review Supplier Forms
Verify the following documents
have been received and are complete.
Search for Supplier Record
- Refer
to the search instructions in the Reviewing
Supplier Information topic to determine if the supplier already
has a Supplier ID in OAKS FIN. If the supplier is not
found, proceed to step 1 of "Create Supplier Record."
Create Supplier Record
- myOhio.gov >
MY WORKSPACE > Financials Globe > NavBar > Navigator
> Suppliers > Supplier Information
> Add/Update > Supplier

- Click the Add a New Value tab.
- Click Add.
Identifying Information tab

Update
Supplier Short Name field
with the first 10 letters or numbers in the employee's name.
Update
Supplier Name field with the
employee's full name (40 character limit) as it appears from the HCM
View Name screenshot to ensure entry of complete name including middle
name or initial if provided.
- The
only punctuation used in the supplier name is a dash (-) if it
is displayed on the screenshot.
Click
Check for Duplicate to confirm
that there are no suppliers matching the duplicate check criteria.
Confirm
that Status is "Approved."
Update
Classification to "Employee."
Confirm
Persistence is "Regular."
Expand
the Additional ID Numbers
section.
Additional ID Numbers section
- Click the Look Up Type icon to select
Type as "SSN."
- Update the ID Number field with "E"
followed by the employee's OAKS User ID (from the HCM paperwork) (e.g.,
"E10110001").
- Expand the Additional Reporting Elements
section.
Additional Reporting Elements
section
- Select "State
Employee" from the Type
of Contractor dropdown.
Adding Attachments
- All
supporting documentation must be attached to the supplier's record
on the Identifying Information
tab.
- Acceptable
form formats include JPEG, PDF and TIF.
- Click herehere for instructions on attaching
supporting documentation to the supplier record.
- Click the Attachments
link.
- The Supplier Attachment
page displays.
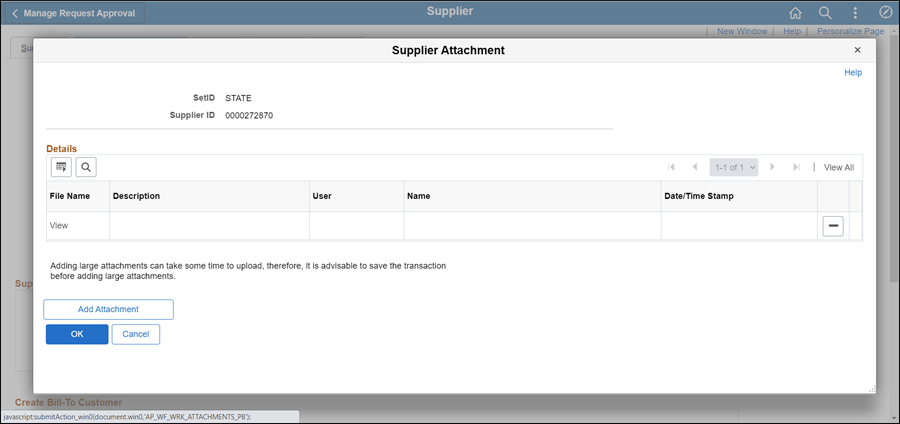
- Click Add Attachment.
- Copy the Document URL
from the Supplier Operations Tracker.
- Click Browse.
- Paste the Document
URL into the File
name.
- Click Open.
- Click Upload.
- The Supplier Attachment
page displays.
Update Description with <descriptive
name of the document> (e.g., "VIF W9 EFT").
Click OK.
- The Identifying
Information tab displays.
- Click the Address tab.
Address tab
The Address
tab is updated with the information provided on the HCM screenshots.
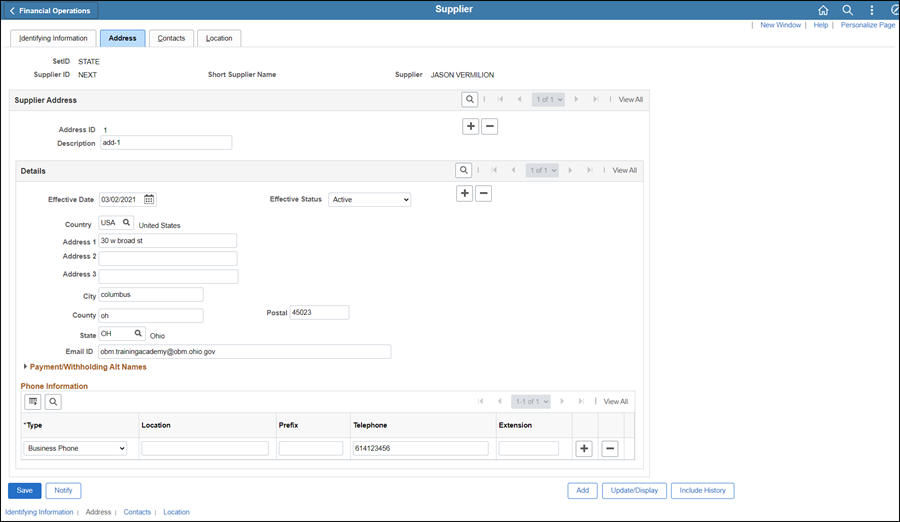
- Update Description field with the
Address ID.
- The
Address ID is the number of the address being entered (i.e., "1"
for the first address, "2" for the 2nd address, etc.).
- State
Employees only have 1 address listed, which cannot be a government
office.
- If
the HCM screen shows two (2) addresses then use ONLY the mailing
address. If a street address and
PO Box address exist on the same line under mailing, the PO Box
overrides.
- Confirm the Effective
Date displays today's date.
- Update Country if not "USA."
- Enter address using Address 1, Address
2, City,
County (if available),
Postal (zip code),
and State fields.
- Update Email ID field with the work
email address.
- Do
not enter a home email address.
- Select the Phone Information
Type dropdown and select "Business Phone."
- Do
not update the Prefix
field.
- Update the business
Telephone field
with the phone number provided (format 6145555555).
- Do
not enter home or cellphone numbers.
- Update the Extension field with the extension
number when provided.
- If more than one business
phone number is provided, click the Add
a new row icon next to the Extension
field and enter additional phone number information.
- Select
Type "Other"
(only one phone number per Type
can be entered.)
- Click the Location tab.
Location tab
A supplier Location
is a default set of rules which define how business is conducted with
the supplier.
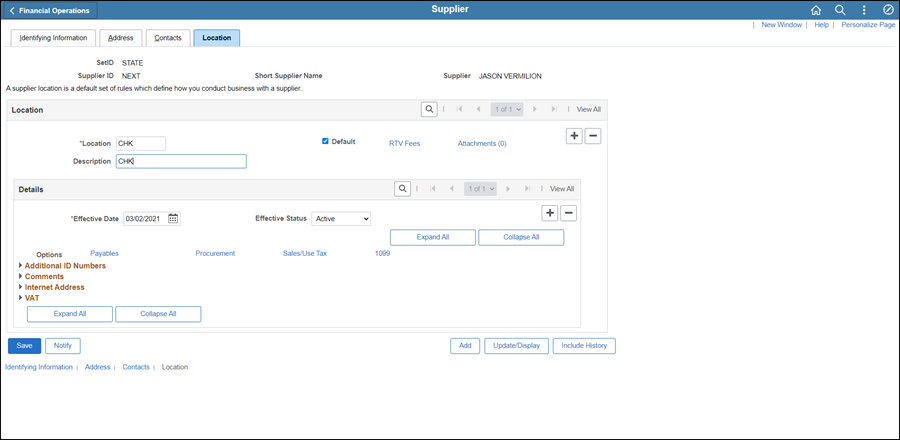
- Enter Location as "CHK."
- Enter Description as "CHK."
- Confirm the Effective Date displays today's
date.
- Confirm the Effective Status is "Active."
- Complete the following steps for each Location
entered (i.e., "CHK" or "EFT").
- Click
the Procurement
link.
- The Procurement Options
page displays.

- Click Additional
Procurement Options to expand the section.
- Click the Payment Terms Options
dropdown and select "Specify."
- Click the Look
up Payment Term ID icon and select "Due Now."
- The
value displays as "00."
- Click OK.
- The Location tab displays
again.
- Click the 1099
link.

- Enter "IRS" (Internal Revenue Service) in the Entity field in the 1099 Information section.
- Enter "1" in the Address
field.
- Enter "S" (Social Security Number) in the TIN Type field.
- Enter the employee's social security number in the Taxpayer Identification Number
field.
- Click OK.
- The
Location
tab displays again.
- If a complete and accurate "Authorization
Agreement for Direct Deposit" was received, complete the following stepsfollowing steps
to enter EFT information.
- An additional HCM screenshot
will be provided from House of Representatives for elected
officials to add or update their EFT. This screenshot will
contain their banking information in place of a voided check/bank
letter as well as the EFT Form.
- Update Location with
"EFT-1."
- Update Description with
"EFT-1."
- Click the
Default checkbox.
- Confirm the
Effective Date displays
today's date.
- Confirm the
Effective Status is
"Active."
- Click the
Payables link.
- The Payables
Options page displays.
- Click the
Additional Payables Options
dropdown to expand the section.
- In the Payment Control
section, click the Separate
Payment checkbox.
- Follow the steps below
to update the Bank
section.
- Select "Specify" from the Bank Options dropdown.
- Click the Look
up Bank icon and select "KEYBK."
This is selected for EFT.
- Click the Look
up Account icon and select "MAIN."
(Maintenance EFT Payments)
- Currency (defaults to USD = US Dollars)
- In the Additional Payment Information
section, select "Specify" from the
Pay Method Options
dropdown.
- Select Payment Method "Electronic
Funds Transfer."
- Click the
Electronic File Options
dropdown to expand the section.
- Click the
Prenotification Required
checkbox.
- Select "Payment
Only" from the Transaction
Handling dropdown.
- Click the
Supplier Bank Account Options
dropdown to expand the section.
- Follow the steps
below to update the Supplier
Bank Accounts information.
- Check the Default checkbox.
- Update the Description
with "BANK ACCOUNT ***** <last 4 digits
of the account number>."
- Update the Bank
Name with the name of the financial institution
provided.
- Select "Check Acct" (checking) or "Time
Dep" (savings) from the
Account Type dropdown
based on the type of account identified on the "Authorization
Agreement for Direct Deposit of EFT Payments" form.
- Update Bank
ID field with the "Transit Routing /
ABA Number" provided on the "Authorization Agreement
for Direct Deposit of EFT Payments" form.
- Update Bank
Account Number field with the account number
provided on the "Authorization Agreement for Direct
Deposit of EFT Payments" form.
- Click the Look
up DFI Qualifier icon.
- Select "01 Transit Number".
- Update DFI
ID field with the "Transit Routing /
ABA Number" provided on the "Authorization Agreement
for Direct Deposit of EFT Payments" form.
- Click OK.
- Click Save.
- The
Summary tab
will appear.
- Click the Summary tab.
Summary tab
The supplier file Summary tab
provides an overview of the supplier record.
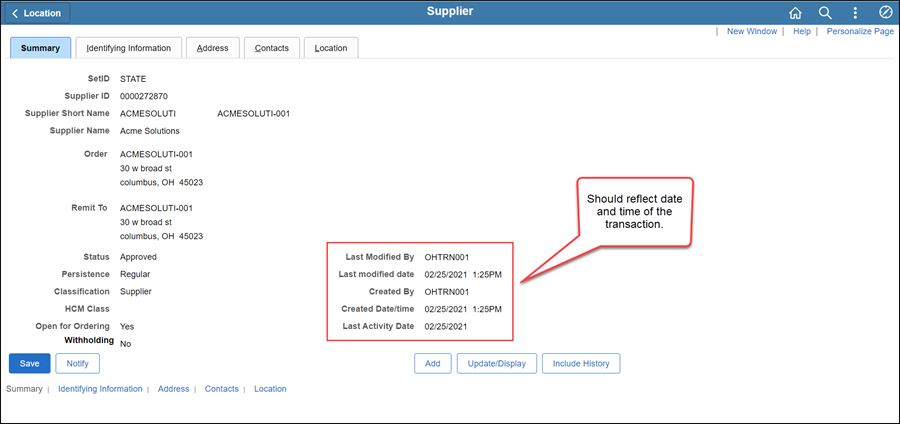
Once all updates have been made to the supplier record, review
the Summary tab to
verify that the record was modified.
 Next
steps - Updating the Supplier
Operations Tracker
Next
steps - Updating the Supplier
Operations Tracker